
If you’ve been wondering how you can create a resource library like the one I have on Hustle & Groove (get access here) then you’re gonna love what I’m sharing with you below.
A resource library is a great tactic you can use to get people to join your email list. The aim is to provide a ton of value and entice readers to join your list through this type of lead magnet.
Table of Contents
But… before you run off and start creating one, there’s a few things you should think about:
- Where will you host your resource library?
- What will you include inside it? (it pays to have 5+ resources when you launch it)
- What will you say in your welcome emails?
If you’re sitting there, shaking your head and slumping forward because you can’t answer those questions… don’t worry. I've got your back!
Create a Resource Library Lead Magnet
Step #1: What to Include
Let’s start at the beginning. Before you can create your resource library (or The Vault as I like to call it!), you need to decide what you’re going to include inside it.
If you’re just getting started with a blog, then you’ve got a bit of work cut out for yourself. You’ll need to spend some time and think about the types of resources you could include.
To help with that, think about the types of resources your target audience would get a kick out of.
What would they find super helpful?
Next, think about how much time you’ve got and consider how long it’s going to take to create these resources.
[feature_box_creator style=”1″ width=”700″ top_margin=”5″ bottom_margin=”5″ top_padding=”5″ right_padding=”” bottom_padding=”5″ left_padding=”” alignment=”center” bg_color=”#75d7e1″ bg_color_end=”#0eb9cb” border_color=”” border_weight=”” border_radius=”” border_style=”” font_size=”14″ font_font=”Montserrat” font_shadow=”none”]
Pro Tip: You want to include at least one awesome lead magnet, like a video course or workshop or ebook, as these are seen as high value.
[/feature_box_creator]
If you are limited for time, consider outsourcing the creation and formatting, otherwise, follow me and watch this quick video of how you can create amazing lead magnets inside Canva.
[video_player type=”youtube” width=”853″ height=”480″ align=”center” margin_top=”0″ margin_bottom=”20″]aHR0cHM6Ly95b3V0dS5iZS9sX2taa2dKZzRFbw==[/video_player]
If you’re still struggling for ideas, here’s a quick list of things that you could include in your resource library:
- A quick start guide to getting started in your niche
- A checklist
- A cheat sheet
- A PDF walkthrough of a system you use in your niche
- A quick video demonstrating how to use xyz
You get the idea.
Now that we’ve got some resources to add to our library, let’s go ahead and create it.
Step #2: Creating a Resource Library
For this step, you’re going to need a couple of things:
- A WordPress site
- Dropbox, Google Drive or Amazon S3 storage access
- Images of each resource (created in Canva). They should be around 300 x 700 pixels
- An email service provider
If you’ve nodded ‘yes’ to all of the above, you pass Go and can move onto watching the video below.
If you don’t have these things in place yet, go ahead and get those sorted. We’ll wait for you…
[video_player type=”youtube” width=”853″ height=”480″ align=”center” margin_top=”0″ margin_bottom=”20″]aHR0cHM6Ly95b3V0dS5iZS9rek9Bc253UWxFTQ==[/video_player]
Don’t forget to password protect your resource library and write it down! Make it something simple that you’ll remember and that’s easy for your subscribers to enter as well.
For plugins to manage your resource images, check out some of the following:
- Essential Grid plugin (paid)
- WordPress Portfolio plugin (free)
- OTW Portfolio light plugin (free)
- Nimble Portfolio plugin (free)
If you want to change how your password protected page looks, you’ll need to access the code to do that. This article here gives you a rundown on it, it’s fairly simple, but if you struggle with code, pay someone on Fiverr to do this for you.
Step #3: Creating a Welcome Email Series
This part of the process is really important.
You’re probably already familiar with setting up your email to deliver your lead magnet, but what about onboarding someone new to your list?
Have you got that set up? If you haven’t, now’s the time to implement it!
Generally, you should aim for about 5-7 emails that go out over a week.
The aim is to introduce people to you, tell them what they can expect from you and to provide them with more valuable content.
Here’s a quick snapshot inside my onboarding email sequence for when people join the H&G Vault:
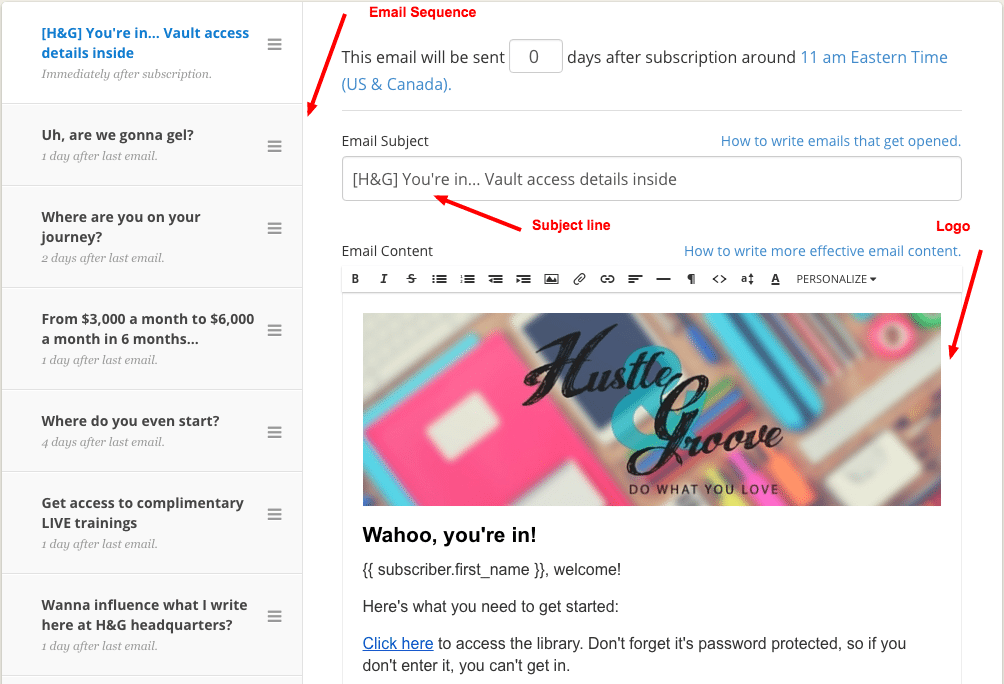
Your email sequence should ensure that it includes the password to access the resource library… forget to include that and you're gonna annoy your new readers! Don't forget to include it inside the first email, this should go out immediately after they've confirmed their email, so day 0.
Creating a resource library is one of the best ways to build your email list.
It’s a great lead magnet that provides a ton of value, and you can constantly update it by simply adding all your content upgrades to it each month (like I do).
This way, over time, you build up a huge resource that you could potentially charge for one day in the future… like when you decide to start a membership site or something… 😉
What type of resources do you have inside your resource library? Share links to your library below so we can all support each other.
4 replies to "How to Create a Resource Library and What to Include"
[…] How to Create a Resource Library for your Blog […]
[…] One of the first things you should focus on when starting a blog is building your email list. […]
This is a great article. Thank you for making it easy to understand. For storing the files, you mentioned Dropbox or google drive. What permissions do you set on the storage location? Do you secure the storage location too? If it’s only password protected on the WordPress page, are you not afraid of people going directly to the storage location?
Hi Bertha, with either Dropbox or Google Drive, it would be extremely difficult to locate the URL for the file, given that both of these storage locations create numbered URL’s, not those based on the filename, so no, I don’t worry about people going directly to the storage location because unless I’ve actually provided sharing permissions, they cannot access it without being logged into my account and I use secure passwords 🙂